

Sorry it’s been so long between posts! with the kids home and the summer holidays now in full swing/nearly over! I’m finding it hard to make time for pattern writing and blogging. Bare with me, I should be back on track in September, when the kids go back to school! Today I’m going to show you how to make cake pops.
This post may contain affiliate links, view my disclosure policy for details. Note: all opinions are 100% my own.
Recently I was asked to make some cake pops for a friend and the lovely people over at Hobbycraft have sent me some ingredients to make them, Thank You Hobbycraft!
So what are cake pops? sponge mixed with frosting, formed into a ball, pushed onto a stick, and lastly coated in chocolate or candy melts. Or in short – scrummy balls of cake on a stick!
(Well this is how I make them, Some people like to use a cake pop maker, baking small balls of cake then add that to a stick, both versions are still cake pops, I just prefer the truffle texture on the inside)
I’ve made cake pops quite a few times now, but only with a chocolate coating. This is my first time using Wiltons Candy Melts. I am going to going to tell you everything I liked and disliked about them, what I learnt and I’ll give you as many tips as I can.

Before you start here are my Top Cake Pop Tips:
- Watch You Tube clips by Wilton
- Make sure you have a suitable stand before making them
- Dont dip really cold pops (it cracks the coating)
- Heat your candy melts at 50% power
- Heat your candy melts slowly
- Practice, Practice, Practice!
Makes 20 (+ 6-8 extra for practicing)
You Will Need:
Sponge – bake at 180c/350f/gas mark 4 for 20 minutes
225g/8oz Butter or Margerine (extra for greasing)
225g/8oz Caster Sugar
225g/8oz Self Raising Flour
3 Large Eggs
Frosting
1 x Tub of Betty Crocker Velvety Vanilla Icing
Coating
2 x Bags of Wilton Candy Melts (I used Pink & White)
2 x Tubs of Sprinkles (I used these by Cake Angels – Pretty in Pink)
Equipment
2 x 7-8in cake tins (or any size you have that will fit the mixture, you are going to break it up once it’s cooked anyway)
20 x Cake Pop Sticks (+ a few extra for your spares)
Ice Cream scoop (for ball sizing)
Stand (for your decorated pops)
Ok, Ready to pop?
Add your castor sugar to the butter & mix

Add the eggs & mix

Now add the flour & mix


Grease the cake tins & divide the mixture between the two tins


Bake in pre-heated oven for 20 mins

Once the cake has cooled completely, crumble with your hands
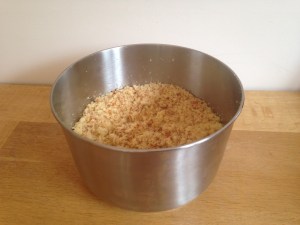
Add the frosting a little at a time checking the consistency, (not too sticky!)

It should look like this

Take your ice cream scoop, scoop some cake mix and roll it into a ball in the palm of your hands.


Place them all onto a tray and refrigerate until firm.

Now for the sticks, melt a few candy melts in a small pot, 30 seconds at a time on 50% power.

Take a stick and dip about half a cm in the melts and then push into the cake pop. Place back into the fridge until set.

When your ready to dip, take your pops out of the fridge to come back to room temperature.
Melt more of your candy melts in a tall jug in 30 second intervals at 50% power, stirring even when they still look whole, stir! they will melt, just be carefull not to overheat or you will burn the melts and they will go lumpy!

leave the melts to stand for 10 minutes before dipping

Take your cake pop, dip into the candy melts (covering the whole pop up) lift out, hold at 90 deg to the jug and slowly rotate, gently tapping the send of the stick (sorry no pics, its hard to do this and take pictures) if decorating with sprinkles do this now before the melts set, if you are piping squiggly lines then let dry and decorate in a minute.
Here are some ideas for decorating

You will need something sturdy to hold your cake pops. A styrofoam block is fine, they are top-heavy so a cardboard box probably wont do (you need to support the bottom of the stick as well as the top). My husband made me a wooden stand, and drilled some holes for the pops.

I covered it with a piece of fabric, stapled it underneath and used a scalpel to poke the holes through.
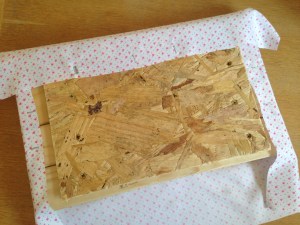


I made mine look pretty by adding a ribbon.

If you have any candy melts left over (I opened two bags of each colour) melt them back down, pour into ice-cube trays, put them in the fridge to set, then pop them out place into a ziplock bag and they will keep for ages in the cupboard.


So, do I like Candy Melts?
I do now, but I didn’t!
They took a lot of practice, I had a lot of cracks, headless pops! and lumpy pops! it might be worth getting more melts than stated to make sure you have enough to practice with! remember they keep for ages in zip-lock bags and the rejects still taste amazing even though they might not look as pretty!!
I love the colour range on offer, the silky smooth appearance of candy melts, but I think I still might prefer the taste of chocolate!!!
When using candy melts you can melt, dip, go away, re-melt and dip all day long, I loved this about them, chocolate is less forgiving with re-melting.
From reading up online for tips, it seems that ez-melts by Wilton can also help with the melting/thinning (I didn’t know this until I had already started making them, so I’ve never used them myself!)
Happy Popping!

Wow they look amazing ! I’d never heard of Cake Pops until this morning. I shall have to try them out.
Aw thanks Treas! You should, I know you’ll love them, who wouldn’t?…..they contain cake!!! 🙂
Wow! Thank you! I constantly needed to write on my website something like that. Can I include a fragment of your post to my website?.
Good article, thanks for sharing, please visit
our website
Calling all business owners! Upgrade your marketing game with the help of techcitystudio. Explore their daily updates on the latest marketing trends and gain valuable insights to boost your business’s growth. Don’t miss out!
Nice treat for kids, thanks kidle
Your blog has really piqued my interest on this topic. Feel free to drop by my website QH9 about Car Purchase.